Showing posts with label Desserts by Enchie. Show all posts

Thursday, May 26, 2016

Homemade Ice Cream

In connection with my new KitchenAid Stand Mixer, I got a free KitchenAid Ice Cream maker worth 8,000php. I think I got a pretty good deal in terms of getting freebies from KitchenAid for every KitchenAid mixer.

Here's one of the best things I made from my kitchen--- Ice Cream!

KitchenAid made everything easy with their KitchenAid Mixer, you can basically connect any KitchenAid attachment using the very same machine and that includes an ice cream maker. Again, I never thought that I'll be making ice cream on a regular basis at home. A lot of ice cream recipes are featured online and you can watch demos on Youtube as well. Being a chocoholic, of course, Chocolate Ice Cream was first in my list to try.

In order to achieve a good result, I watched demos online on how to attach and use the KitchenAid Ice Cream Maker first. I suggest you do the same. After securing myself of the how tos of the machine, I immediately searched for ice cream recipes with actual demo using the featured KitchenAid Ice Cream Maker.
With a good equipment at hand, making ice cream was easy. The KitchenAid Ice Cream Maker is just right for the size, it's not too big or bulky. To describe, it's a bit smaller than a 5qt. mixing bowl.
My children are always excited... I mean, isn't it fun just to have the thought that we can make ice cream anytime? Experiment with flavors and ice cream container sizes. We can go unlimited even. The last thing I enjoyed making with my children was a banana split using homemade ice cream. 

Fresh bananas, rich chocolate ice cream, oozing whipped cream and dark chocolate ganache, nuts and caramel to top... who can say no to that!

Saturday, April 2, 2016

KitchenAid Heavy Duty Stand Mixer K5SS

When I started baking, I thought that it will just be an additional hobby, a past time. Since I love to cook, baking came with a breeze. I gotta say, quite an achievement for someone who did not study baking at all. But in everything that involves the kitchen, one must have a good equipment to aid you to be more efficient and to be able to get better results. I am already happy with my Homemaker Stand Mixer but at some point, knowing that I bake a lot, I don't want to over use my only and the very first mixer I have. Other than that, my husband offered that he'll help me start up a small business so I can share my creations. 

Share... sharing is a strong word. To be honest, everytime I would bake something, I always make a little more so that my husband can bring some for his co- workers. Not to sell but just to share, since their working hours are intense. In the end, those same people who had a piece of what I make later  encouraged us to sell the pastries so we earn something instead of giving it out.  So eventually I agreed and created a pastry that's not often sold in the market and it became a hit. From then on, and as we reached the Christmas Season, I decided to upgrade to a more suitable mixer in order to meet  demand and also preserve the old one.

What else will I get but a KitchenAid Mixer. The choice went around an Artisan and the Heavy Duty Stand Mixer K5SS mixer. I ended up with the Heavy Duty Stand Mixer K5SS mixer (at 33kphp) because of its functions and simply because it is in the Professional Heavy Duty Series, a more powerful batch more than the Artisan and Classic KitchenAid mixers. So if you're in search of a good mixer that's not too expensive yet, powerful, this is the one.

The set includes:
Powerknead™ Spiral Dough Hook, Flat Beater, and
Stainless Steel Wire Whip
5-Qt.
Actually I was torn between the Artisan and the Heavy Duty. I like the Artisan because of its color choices and it comes with a pouring shield. But I don't really need those. It's really all about the bang for the buck thing. As expected a freebie came with my purchase. I guess it was meant to be because I got the best deal. I got a free KitchenAid Ice Cream Maker worth 8Kphp! 
I'll post about it soon!

It's about time that I made this upgrade. Whether my humble business will be a success or not, this mixer will make people happy through my pastries given or bought from us. I don't spend so much on my personal needs, but for every gift I give myself, there will surely be a story behind it and why it's worth it.

Tuesday, November 4, 2014

Cake Pieces

From cupcakes and small pastries, I've shifted to baking cakes. My family loves cake. Even on a regular family lunch or any gathering there should be cake on the table. We've tried almost every cake in the market. From commercial birthday cakes and specialty cakes sold at any bake shop and even restaurants. These cakes doesn't come in cheap. A regular specialty cake can cost for as low as 700php and as much as 1,000++php.

Since we're so into cakes, I've decided, why not bake our own. For the past 2 months, I've made a total of 5 cakes in different flavors and types. My first project was my son's birthday cake. I made an 8", 2 layer Chocolate Cake with Dark Chocolate Ganache. It was very good. From there, I went on with more. There's Red Velvet which is my Dad's favorite, a traditional Sponge Cake and recently, I made 2 cakes in a span of 1 week: 

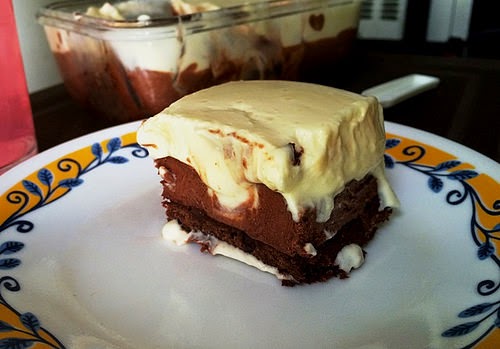
Chocolate Chiffon and Triple Chocolate Mousse Cake

Other than the old-fashioned sponge cake, I concentrated on Chocolate cake recipes because everyone loves chocolate. Chocolate is easy to make and is easy to coat around the cake. Chocolate can perfectly go with any other frosting as well. 
My Chocolate Chiffon was soft and fluffy, but my mom advised me that I could have gotten better results if  I used a tube pan. Well, the reason why I didn't use the usual tube pan was because I want to decorate the cake and fill it with chocolate ganache.
My Chocolate Chiffon is a 2 layer cake that has a thin chocolate filling in between. Coated with my favorite chocolate ganache and with swirls of buttercream frosting and chunks of dark chocolate on top.

The kids loved it! My siblings  and my parents ate it with their coffee. I was at my mom's house when I baked both the Chocolate Chiffon and Chocolate Mousse. She has a bigger oven and her kitchen is more spacious. It feels good to be able to work in a bigger kitchen, I also noticed that work is done faster.

Chocolate Mousse is one of my favorite desserts, whether it's served as a cake or as plain mousse with some fresh fruits.

My first Triple Chocolate Mousse turned wonky:

1. The cream for the top layer did not turn stiff that I have to just pour it on top and straight in the fridge.
2. Some time in the middle my dad lowered down the temperature of the fridge.

So imagine... the topping problem could have been solved if the cake was refrigerated longer and was in proper temperature. The following day, my mom and I tasted it and well, it's still okay with me. It's ridiculous not to have a slice. Later in the day, the whole cake looked better after setting the right temperature.

This picture was the wonky part. Please bear... Over-all, it was delicious!
The following week, I went for another try this time, in my own kitchen. I made half of the recipe from what I originally prepared and I used my Chewy Brownie recipe as cake base.  The second attempt was way better.

The chewy brownie at the bottom held the whole thing together. I also used a glass baking dish so when refrigerated, it cooled the whole cake easily.
Wonky or not, I'm still proud of myself being able to come up with such treats. Before I spend so much on a box of cake. Now, as long as I have the ingredients around, I can bake more than 1 cake of different types. It's all worth it, especially if it's for the love of seeing my family happy and for the fun of  baking!

Wednesday, October 8, 2014

Homemaker Stand Mixer

Baking has become a hobby since middle of last year. I started with a hand mixer, then eventually, my mom and dad saw that I was enjoying it so they gifted me with a Homemaker Stand Mixer.  My parents used to own a bakery when I was a kid, so baking in the family isn't new.

I made this special post on a Homemaker Stand Mixer to answer questions/ inquiries that were and still are often asked in an old post.

* I am not a an expert on any field, not a certified pastry chef, baker etc... I did not take any baking lessons that can approve or disapprove anything when it comes to baking. Anything stated on this post is solely based on my experience as a Homemaker Stand Mixer user for 1 year.

Here we go!

My Homemaker Stand Mixer was purchased from HMR Surplus, Sta. Rosa Laguna. If I'm not mistaken, it was at 1500php. It was the only mixer available, brand new, boxed and sealed. 

Inside:
Manual
1 Dough Hook,
1 Beater, 
1 Whisk, 
4 litre stainless steel bowl (detachable)

It was a lucky find I must say, because we were informed that the items sold in that surplus outlet comes in randomly.  Sometimes, there are other stand mixers of different brands, and most of the time quantity goes 1 or 2 for each kind. It wouldn't hurt to ask, but don't expect that they'll give you "new stock" when you go to any surplus shops.
If you can't find it in HMR, try Save On Surplus, Market- Market, Taguig. They sell Homemaker kitchen equipments including the Homemaker Stand Mixer for 3990php. I've visited the place several times, and they always  have the mixer on display. Over the weekend, I went to check again and the mixer is still there.

Performance/ durability:

This Homemaker Stand Mixer has planetary action , 6 Speeds Pulse. Take note, it is not comparable to a KitchenAid Mixer. There's a reason why it's way more affordable than a KitchenAid. 

With what I mentioned in a separate post, for beginners like me, it's perfect for practicing. In one year, I made lots of pastries and cakes using this mixer. I always have 2-3 mixing bowls ready. If I need to make a huge amount of pastries, I don't mix it all at the same time. I cut the recipe so it will not overwork the mixer. Then, I just throw in another load.

I placed it to a test last Christmas. I made 4-5 dozen cupcakes (with frosting), more than 100 chocolate crinkles (in one day) and brownies all as our Holiday giveaways.  I often use my Homemaker Stand Mixer because I bake a lot. On a weekly basis, I make 6 to a dozen cupcakes with frosting and a cake. It depends on what I want to make and no, I don't sell them, I just like to bake. I save a little for myself and my children then the rest goes to my parents and siblings or I give some to my husband's team at work.

For business purposes, I can't really answer for that inquiry. But personally, in case I'll be putting baking a notch higher like selling my pastries, I will definitely invest on the best mixer around. 

With all that was mentioned, my Homemaker Stand Mixer is working like brand new.

Quality of pastry:

I did not take any baking lessons. But I've learned that the secret to baking is to follow the recipe step by step. That includes use of the right materials, measurement and ingredients. The mixer is just secondary for me. If I wasn't given a stand mixer, I will probably continue with a hand mixer. But then again, nobody wants to overwork their arms and hands right? it gets really painful especially if a recipe requires a certain level of consistency,  this Homemaker Stand Mixer works for me.
Here are some of my creations made with the help of a Homemaker Stand Mixer:
In addition, I haven't used the dough hook attachment yet. I'm giving it some thought, been gathering old bread recipes from my mom's bakery. Soon!

I hope this entry is going to be useful for those who love to bake. The Homemaker Stand Mixer is a good choice for starters. It mixes well, it gives perfect results. I'm satisfied with its performance.

Tuesday, August 5, 2014

Easy Banoffee

This was not my first attempt on a Banoffee Pie but this was the only one that gave me a more presentable result. The previous ones were delicious but the filling turned out runny. I don't really expect to get perfect results on the first try, but every time I want to make something new or I'm not really familiar with, I take note of the things I need to work on and I do it again.
First I needed to learn how to make caramel (Dulce de leche/ caremelized milk). Lucky if you're living abroad because they sell this in can ready- to- use. For us here in the Philippines, all you have to do is to get a pot of water sink your can of condensed milk side ways and boil it for 1 1/2 hours- 2 hours. Make sure that the can of milk is always submerged in water or it's going to explode if it dries up. Once done, let it set in the very same pot of water for 15- 30 minutes and slowly add tap water until it's cooled down.

A lot of work huh? It's gonna be all worth it later on once you're used to it. The fact that you can already make your own caramel is already a +++.

Materials: 
  • Spring form pan or any container you want to use and that is easy to cool.
  • Mixing Bowl
  • Spatula
  • Mixer 
  • Grater for dark chocolate
Ingredients:
  • 1 stick unsalted butter (melted)
  • 1 pack of crushed graham crackers
  • 3 ripe bananas (sliced into thin pieces)
  • 1 cup heavy cream (from the refrigerator)
  • 4 oz. cream cheese (at room temperature)
  • 300ml can of caramelized condensed milk
Procedures:

Crust:
  • In a mixing bowl, mix crushed graham crackers and melted butter. Mix until well- blended.
  • Pour crushed graham into pan or molder.
  • Spread the crumbs evenly from the bottom to the sides. Refrigerate for 30 minutes.
Filling:
  • In a bowl, mix banana slices with half of the caramelized milk.
  • Pour and spread banana filling on the prepared crust evenly.
  • Pour the remaining caramelized milk and spread again evenly.
Cream Topping:
  • In a separate mixing bowl and on medium speed whip heavy cream until stiff peaks form.
  • Add cream cheese and mix until well- blended.
  • Top cream over the banana and caramelized milk mixture, spread evenly. 
  • Garnish with dark chocolate shavings.
  • Refrigerate for 3-4 hours before slicing.
Since this is a no- bake Banoffee, it is important to keep this dessert in a cool place all the time. Please bear with how my Banoffee looks, I made boo-boo on the less banana filling and more cream topping part. Well, I just gotta keep trying right? I'll try the bake version some time and post it here too. But for now....

Enjoy!

Thursday, June 19, 2014

Chewy Oatmeal Cookies with Hershey's Chunks

It's school time once again here in the Philippines and one of the things I juggle with everyday is coming up with a good, delicious and healthy snack for my boys. Aside from sandwiches, cupcakes, biscuits, children will always look for chewy cookies. My children are very fond of cookies. It's been in our grocery list ever since. But, not just any cookie can be considered. My kids like it soft, chewy, with a lot of chocolate chips and no raisins.

For the first week, I baked some Vanilla Cupcakes and a batch of Chewy Oatmeal Cookies with Hershey's Chunks. Since I don't have a recipe at hand, I went to allrecipes.com/ and as always, I was graced with an easy recipe. (this is not a paid post)

The original recipe can yield up to 32 cookies, I adjusted the recipe and came up with 12- 15 palm- sized cookies. The recipe itself was perfect. It didn't require too much. It's the basic baking ingredients put together. But I still made some changes based on how my family likes it. 
  • It just so happen that I have Hershey's dark chocolate bars in stock, I chopped it into small chunks and replaced the semi- sweet chocolate chips with it. 
  • I eliminated the walnuts because I don't want it to be too chunky. I mean, the oatmeal itself adds enough texture already.
  • Since I've run out of greaseproof paper, I buttered my cookie sheet. Butter is way better than any oil.
  • Instead of 12mins, I baked my cookies for 15 mins. I wanted it to be golden brown .
I'm happy how the cookies turned out. It's crunchy on the outside, but soft and chewy inside. The Hershey's chunks blended well with the oats. It's not too sweet. The size of the cookie is just right for a kid to finish it. My husband and our 2 boys love it. I even packed some for my dad because he loves oatmeal.

Wednesday, April 16, 2014

Easy Karioka Recipe

If you love eating Banana cue, Kamote cue and Maruya, you gotta love Karioka as well. Karioka is made of glutinous rice flour, deep-fried and coated with plain sugar or coconut- sugar mixture. Personally, anything made of glutinous rice flour is my favorite. These Filipino snacks including Karioka are prepared and cooked in almost every Filipino household. Just today, I decided to make some for the family as an afternoon snack.

The recipe I've prepared is easy. It's simple just by mixing the glutinous rice flour with water, make some balls out of it, coat each with sugar then fry.


Ingredients:
  • 1 1/8 cups Glutinous Rice Flour
  • 1/2 tsp baking powder
  • 1/2 cup water
  • 1/2 cup brown sugar
  • oil for frying
Tip: Prepackaged glutinous rice flour is now available in the market.
    Procedure:
    • In a bowl mix glutinous rice and baking powder.
    • Slowly add water until a "sticky- but not too wet" consistency is achieved. Add glutinous rice if it becomes too sticky.
    • Heat oil in pan.
    • While heating oil, make rice flour balls and coat each with brown sugar.
    • Deep or pan- fry balls until light- golden brown.
    Tip: Flour hands to avoid sticking.

    The over-all result was delicious. The Kariokas were soft, chewy, it's not messy to eat because of the sugar coating and it doesn't harden even if refrigerated and eaten the following day.

      Friday, March 28, 2014

      Blueberry Cheesecake From My Kitchen

      My love for Blueberry Cheesecake took a notch up. Why? Well, this time, the Blueberry Cheesecake I enjoy is prepared and baked straight from my kitchen. This featured Blueberry Cheesecake was actually my first try on making cheesecakes. One fine afternoon, I was itching to bake something, so I thought I go for a cheesecake.
      The recipe I followed for this cheesecake came from the Good Housekeeping Bake It! recipe book. It was my sister's Christmas gift for me last year. I followed the basic New York- Style Cheesecake recipe then I topped my plain cheesecake with my special sour cream mixture and some blueberry preserves. It would be more fun is mobidev will create something for baking enthusiast like me. Easy access recipes online.

      I like the golden light brown result of the cheesecake. Some would prefer coating the sides with crushed graham.
      My first cheesecake turned out great. It was soft, the taste of the "not too sweet" cheesecake matched the rich flavors of the sour cream and blueberries. Since I started baking, I've lessened my visits to pastry shops in our area. Being able to come up with my own cheesecake is another baking achievement.

      Friday, March 21, 2014

      Cream Puffs

      After a month of being not able to bake, finally I was able to find time again. With my next project, I made some Cream Puffs. As for each pastry I try to bake, I don't expect it to come out perfect on the first try. But for some reason, I'm blessed to have good results for every first attempt I make.

      I learn so much even without proper training through some readings  and continuous practice.  Let me share a few of the baking rules I've learned.
      • Follow and understand recipe instructions all the time.
      • Take note of the right baking essentials used for every pastry or cake recipe.
      • Never rush into things.
      • Right temperature is key.
      Following these may have been the key that helped me yield how pastries should be. The first batch of Cream Puffs I made turned out pretty well, as if I bought them from a local pastry shop. I was very happy and satisfied.
      The recipe I used for my Cream Puffs was from a pastry book. Since I started baking, I always use ingredients of the highest quality being sold in the market. With that, it's easy to achieve the right consistency, texture and over-all mixture in making the pastry.  I saw the difference between now from the time when I baked my first- ever set of cupcakes, I used cheap products then.

      The custard filling was easy. My mom taught me how to make it. It's just a mixture of condensed milk, egg yolks, cornstarch and water. (As advised, not to put the egg whites to waste, with sugar and cream of tartar, you can use it to make meringue.)
      With regards to the Cream Puff recipe, in case some of you might ask, please give me a little more time, I plan to post it. I just need to fix it accordingly and the right way so you guys can get the very same result. It's hard to post something and get complaints of not getting the right outcome. Since I made some adjustments, it may lead me to concoct my own recipe basing it on those changes made.
      The cream puff shells can also be used for chocolate eclairs. For a palm-size cream puff shell, a table spoon or a scoop using an ice cream scooper of the dough will do. Of course, the smaller it is you get bite- sized cream puffs. Cream Puff/ Chocolate Eclairs are my favorites. Being able to bake my own was truly a personal achievement. I never thought that I will come to a point in my life when I'll be baking the things I love.

      Friday, February 14, 2014

      I Baked His Cake For His Birthday

      It was my first time to actually bake for someone's birthday. I started making cheesecakes mid- January of 2014. I was really planning to come up with something personal for my husband's birthday to make it extra special. Thanks to my sister who gifted me with a baking book for Christmas, because that's where I found an easy, delicious cheesecake recipe. 

      2 weeks before my husband's birthday celebration, I tried my first New York Style Cheesecake. Thought I start practising something new. My first cheesecake turned out great. I was confident that I'll be able to come up with my husband's cake in time for his birthday.
      Here it is: Plain new York Style Cheesecake with 3 toppings to choose from. Fresh strawberries, blueberries and strawberry preserves. My husband liked the idea that he gets to choose/ "dress up" his own cheesecake.
      As usual, the little ones couldn't take their hands off the cake. It's different and luscious to eat flavors of sorts to match the cheesecake, I love it plain as well.

       I wasn't able to hand him his birthday present the day of his birthday. The gift came in late because I have to order it thru my mom-in-law. It's an iRig PRO. It matches all the apple gadgets he has for his compositions and for creating music. It's goes along well with the essential Apple apps which was made possible by the ipod, ipad and iphone software development company. These geniuses, they just know how to come up with an answer to everybody's needs when it comes to modern technology.

      As for me, I'm happy to see the face of my husband radiating with happiness as he blew his birthday candle from the cake I made.

      Monday, February 3, 2014

      Sweet Delights I Love To Make

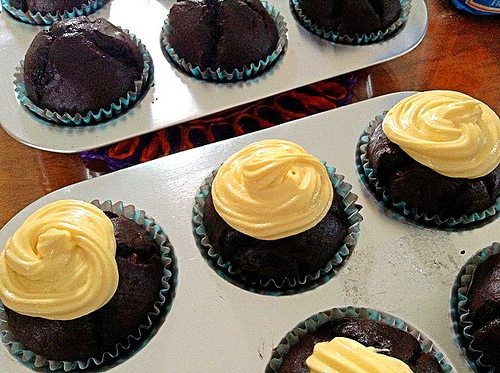
      I said goodbye to 2013 and welcomed 2014 with some sweet treats. Since I got the baking materials my parents gifted me with for my birthday, my kitchen's been very busy. Thank God for the line of occasions including the Holiday Season, I was able to use those to practice my baking skills. For Christmas, I made some chocolate and red velvet cupcakes with butter cream and cream cheese frosting. Well, my mom requested it to add as desserts. Before Christmas, I made more cupcakes for my little boy's Christmas party.
      The only problem I encountered with these cuppies was the frosting. I wasn't able to buy the pastry tip I've always wanted. I've been a frequent visitor of a known pastry shop near our place, it's just that most of their customers were also looking for the very same tips I needed. Anyway, I settled for what I had at hand. So far, the frosting for the chocolate cuppies went okay, but the cream cheese topping for my red velvet looked terrible. Feels like I'm not totally connected while doing the frosting since I know I'm not using the right tip.
      Aside from cupcakes, I was also into making chocolate crinkles and fudge brownies. 2 pastries that my kids love. And recently... Cheesecakes!

      I've always wanted to learn how to make this rich and yummy cake. I'm proud to say that I was very successful on my first try using easy techniques. It's not as perfect, but as soon as I got a slice... ooohhh, mouth-watering! And yes, I also made one for my husband's birthday... I'll post about it soon...

      Wednesday, October 16, 2013

      Surprise Mixer

      To give a little light on this "baking thing". My family's been into making bread and pastries ever since I was a kid. My parents owned a bakery. My mom and dad made Pandesal, Cheese rolls, Ensaymada and Spanish bread etc... everything became everyone's favorite. 
      My mom and dad knows how much I wanted to own a KitchenAid mixer. But as we all know, buying one is no joke. Here in the Philippines, a KitchenAid mixer costs around Php25,000. If we're to spend that much, it's best to take baking a step higher and that's probably the best time to put up a business. 

       But as of the moment, this Homemaker Bench Mixer will do. With Planetary Action , 6 Speeds plus Pulse, 1 Dough Hook, 1 Beater, 1 Whisk, 4 litre stainless steel bowl (detachable), it's a great partner on enhancing one's baking skills. My friends with the same hobby gave a full thumbs up on this lucky buy and it's red. I haven't used it yet.

      I'm thanking my dear parents for being thoughtful and supportive. I'm turning 35 next month, married for 10 years with 2 kids, but it feels like I never left home... My parents has always been there for me and my siblings. I'm so blessed to have this kind of relationship with my family.

      My week started wonderfully with a call from my mom and told me that they bought a stand mixer. And when I talked to my dad. 

      Here's what he said:
      "Anak, yan na muna pang practice- practice, tapos bibili tayo ng KitchenAid".  ( For now, this mixer is good for practicing your baking skills, then we will buy a KitchenAid Mixer). 

      I didn't even ask for it, but they're saving up for the big one. I'm so inspired that's why I want to bake a cake!

       And yes, my intention is to learn not only to make some sweet pastries but my mom's pandesal and her famous cheese rolls as well. Baking my mom's famous breads is a planned surprise. I just want to surprise them one day and serve some hot bread on the dining table.

      With a new mixer, it doesn't mean I am going to let go of my mom's 20 year old hand mixer. Our hand mixer is working just fine, it's perfect for making small recipes and quick mixes. I just love the thought that I have both mixers!

      It's happiness having freshly baked bread coming from your own oven first thing in the morning. I experienced that thru my parents when I was a kid. I want to do it for my children and my husband. It's one of the fond memories I had as a child and I will cherish and pass it over to my family.

      VISIT: Homemaker Stand Mixer 2014 post  for more information. Thank you.

      Pastries By Enchie

       I love to cook, but baking is another story. So here are some of the pastries I've made for the past weeks. I have to say, it's really hard to perfect something I don't really have knowledge of. My interest in making pastries started early this year. I just wanted to do something new. Something that my family can also enjoy, especially my 2 kids. Right now, making pastries has become a hobby. I try to bake every weekend, either a new recipe, or I stick with an old one and improve it.

       Most of the goodies I make are baked to my preference. From the texture, the taste, down to the frosting. Pastry shops are everywhere here in Manila and boy they're expensive. And come to think of it,  not all pastries being sold are as appealing and tasteful as their dining room or the "cute- looking" bake shop itself. I learn from those unsatisfying experiences  as a customer, then I imagine making my own.

       Putting up a business is far to be considered as of the moment by the way. I just want to be the mom who can bake for her children. It's very rewarding to personally bake pastries as snacks. Before, I go to a local bakeshop to get some sweet fix. Now, I make my own. My eldest son loves my cupcakes as his "baon" for school. And he even told his best friend whom he share his cupcakes with "his mama" makes them.
       Soft, moist Fudge Cupcakes coated with rich dark chocolate. 

       There's still a lot to learn. Some people they enroll in baking classes to have background. As much as I want to, I don't have the extra time for it, so I try my best to learn by reading recipe books, watch videos, demos then practice, practice, practice whatever I can absorb. And when I'm finally graced with the said time, I will get myself the proper education.

       Most recipes I've tried are good for 12- 24 pieces. Once I've perfected the recipes, I will share a couple here in my blog. 

       It relaxes me every time I create something. The Dark Chocolate Coated Fudge Cupcakes in particular was requested by my sister. I was happy to make some for her. She would often by commercial cupcakes. 

      Her favorite is the chocolate coated ones. Instead of buying, I can always whip- up something heavier, richer, delightful and healthier because the ingredients I use are all from the finest quality.

      Blueberry Muffins sugar-cinnamon crust, topped with cream cheese frosting.

       As much as possible I don't add coloring or anything artificial. It's just the basics enhanced to the top. Well anything for my family has got be from the finest. It's fun baking, especially when it's for the family or for the simply reason that you want to share and make people happy.

       One of the achievements I've made was to be able to make my own caramel. I immediately tried it with my fudge brownies. It blended well. It's chewy and it gave my brownies a distinct taste and an extraordinary texture. I can't wait to try my caramel as filling for my cupcakes. Caramel has always been a favorite. With caramel alone, one can concoct other pastries, it's up to the maker's imagination ;)

      Made of rich cocoa mixed with some homemade caramel and almond shavings.

      For the mean time, I've skipped 2 weekends of baking. I'm kinda busy gathering and preparing for materials needed for baking cakes, cheesecakes and mousse. All 3, mix and combine... a 2 or 3 layer cake in the making.

      Monday, August 12, 2013

      Sweet Treats From My Kitchen

      I love to cook, but it doesn't mean that I'm as good when it comes to baking or making pastries. Early this year I got the urge and interest to learn and experiment on making pastries. Since I don't have a background on baking, I relied so much on online recipes for my first trial until I was able to concoct my own. I must admit, it's pretty expensive because I spend on ingredients with the risk that I might not be able to get the finished product right. But if one will study the procedures well and research for suppliers, I think everything will turn out fine. Based on my experience, once I've set the basics aside, with a little adjustments, excluding and adding ingredients, I can say I'm getting there...

      One of the sweet treats I love is Chocolate Crinkles. I want my crinkles to be soft, moist and chewy. I'm happy to share that I was able to meet my criteria, but the shape of the cookies were uneven because I had to give the kids the fun part of placing each chocolate ball on the baking sheet.
      My second project was Chocolate Chip Cookies. In a much older post, I shared my love for the cookies made by one of our friends. They used to give us a box full for Christmas. But I can't wait a year just to have a cookie right? So I decided to make my own. Again, like my Chocolate Crinkles, I want my cookies to soft and chewy. The recipe I used was for giant cookies. Again and again, the size of the finished product was uneven. This time, I disregarded the size of the cookie sheet. It wasn't big enough for my giant cookies.
      Before proceeding, let me share a short story about my mom and her love for baking. When I was a kid and we were still living at my grandmother's house in Manila, my mom would often bake cakes for occasions like birthday parties. And not just one but she can go for 3 or 5 different cakes. Later on, my dad and my mom was able to put up a bakery store. Every bread was made from scratch and with my mom's hard work. The bakery business was doing great for some time, until my mom had to give it up because she got pregnant with our youngest and my dad got a job offer. Her recipes are still with her, I even offered to continue the business...
      The next pastry are cupcakes. No, it's not the ready-to-bake mixture. Everything was made from scratch. Thank God my mom has a background on baking. She shared with me her recipe, same with the frosting.

      So far, among the pastries, the cupcakes turned out well on the first try. It's moist both inside and out.

      For months now, I have been preparing these pastries. It will take a lot of practice in order to nail the right texture, size, shape, flavor and consistency. Do I plan to have this as a business? Well, to be honest, as of the moment, I am just enjoying baking and sharing it with my whole family. 

      Next on my list: 

      Cream Puffs
      Chocolate Eclairs
      Making my own fudge cake for my son and dad's birthday.

      Wednesday, August 7, 2013

      French Toast

      Personally, I prefer French Toast than pancakes for breakfast. My kids are used to having pancakes. Now, they're loving French toasts slowly, especially every time I serve it with some chocolate syrup.

      French toast is easy to make. 

      Servings: 2

      Ingredients: Plain French Toast
      • 4 slices of bread
      • 2 beaten eggs
      • 1/2- 1 tsp cinnamon
      • 1/4 cup fresh milk
      • 1 tbsp butter
      • 1/2 tsp vegetable oil
      How To:
      • Mix cinnamon and fresh milk with beaten eggs.
      • In a frying pan, melt butter and add vegetable oil in medium heat.
      • Dip slices of bread one at a time in beaten egg mixture.
      • Fry dipped bread slice and flip until golden brown on both sides.
      • Ready to serve with maple syrup.

      Add ons:
      Whipped cream
      Almonds or Walnuts
      Maple syrup
      Fresh fruit
      Chocolate spread
      More cinnamon
      Fresh fruit
      Bacon or Spam
      Ripe mangoes or slices of apples
      Cream and syrup
      There are more ways to serve French toast. With strawberries, peaches, coconut, powdered sugar, as a sandwich with some jelly. It can also be a good dessert. Just arrange the bread slices in a baking platter stuff it with fruits and cream in between, top it with maple syrup, cream, a little cheese and nuts then bake it for a few minutes.
      My family loves it for breakfast, but French toast can also be an all-day meal. I remember having them as an afternoon snack to match my milk tea. It was really good. And I might just try making a French Toast Dessert Platter.